Monday 29 April 2013

Gift Wrapping Some Yellows and Grays!!!

Gift Wrapping!

Papers, ribbons, flowers, bows.... what's not to love?!!

I could be giving a gift for any occasion, a birthday a wedding.... what's most important  is the accessories I can make for decorating the gift.

Right now I don't even have an occasion, unless you count my recent obsession with a color palette reason enough!!!

Yup... ever since I have had my eye on my mother's yellow and gray mac cover I've been dying to try it out on something... and this seemed to be the perfect occasion!!!

I pulled out everything yellow and gray I had in my stationary cupboard and took some white kite paper as a base and got super creative with some great gift wrapping ideas!

One: My all time favorite felt fabric is back in action....I had some lovely sunshiney yellow and some beautiful gray.


Along with some gray satin ribbon I decided to gift wrap my other all time favorite, My Pride and Prejudice!!


So to start with, you need to cut a rectangle piece with rounded edges of your bow fabric and a small piece of a contrasting color to bind it (Image 1). Fold the rectangle like an accordion and fix the binding fabric by stitching it in place (Image 2). Now I tried sticking with fevicol as it seemed like the easier choice, but felt doesn't stick together, and fabric glue didn't work either, so I stuck to stitching!
That's what your bow will look like (Image 3)


Next you need to wrap up your gift. A little secret is to use double sided tape instead of regular one so that it looks more tidy!!!!


I used double sided for the ribbon as well... may not be the smartest idea..... but it looks damn neat... so use it but make sure you press it tightly in place and use some in between as well.


And now for the final touches!!!

Mark out where you want the bow on the second ribbon, and stitch it in place (Image 1 and 2). It will look like Image 3 and 
Ta-da your bow gift wrap is done!!!!!


Two: My favorite thing to make: Paper flowers!!! 


While I'm creating I get different materials together that I think will work perfectly, But during the process I'll eliminate some and add some... with this one I finally didn't use the pom pom ribbon or the buttons. 


This is one of the easiest flowers ever.
Use any round object the size of the flower you want and mark your circle. 
Fold the paper to get the most circles you can. Cut out your circles and then cut slits into them, but make sure you don't go too close to the center.
Divide your circles to make your flowers, the more you use the fluffier your flower, I used four circles per flower. 
Now start sticking them together with just a drop of glue on each layer. 
I traded the buttons for these pearls, I think they look far prettier...what do you think?!!!


Now have fun with layering. First just place all your objects and see what kind of placement you like and then start sticking. 
I used a doiley, a gray and white polka dotted fabric tape (you get these at Virat Paper Mart near Bandra station as well as Something Special at Hill Road), along with my flowers.


Now isn't that just so pretty!!!

Well that ends my Yellow Gray and White gift wrapping ideas.... but I don't think I'm done with these colors...I foresee a lot more of them in my life!!!

In fact, have you noticed? My blog background is gray and white polka dots and my blog title and post titles are all yellow..... hmmmmmmmm!!!!!!!!

ps: i'm also guest blogging with this post at the super fun Lemon Chutney blog.... do check it out... it lets out little secrets of mine ;)
Saturday 27 April 2013

DIY Monsters Inc!!


So li'l Sid got lots and lots of little toys during my baby shower... absolutely adorable ones... but you know me.... till I haven't made one my very self.... its just no fun!!!

So since i had lots of left over felt and wool from all my previous projects I decided to out them to use.

What inspired me during this little DIY project of mine.... was that while browsing for baby stuff on Pinterest I found these madly adorable and grumpy looking monsters...


Doesn't link to the original... but to Craftgawker which has several more mini felt creatures!!

I was sold!!! No cutsie adorably namby pamby teddies for my kid....My kid is gonna grow up like Boo from Monsters Inc. Kickass!!!

So here is my version of making some fun Monsters!!!


This is really small ... like just about three or four inches in height..... much more fun!


I know I know I should have used a gray thread.... I was just feeling lazy to go get it!!!!


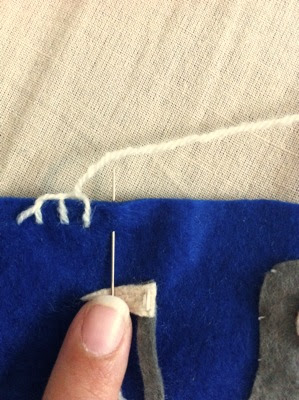
The following is my tutorial in a tutorial - The blanket stitch!!!


Take the needle thru the felt....


Pull it thru the loop....


And ta-da!!!


You can cut the cotton in this fancy shape but once its in its all smashed up together anyways... so don't bother!!!!


Make this stitch nice and good.... so that no cotton comes out..


Done ;)

Once you make one.... you'll get addicted.... they are fast and easy and oh so cute!!! Wait did I say cute? No No .... menacing and scary and frightening is what I meant...... right?!!!


Nah!!!!!


(They are cute!!!!)


ps: I have linked this post on two link parties: 

one is at whipperberry and the other as part of the weekly story at colorsdekor

Monday 15 April 2013

DIY number book

I'm sure I am a great masi..... but since both my nephews live abroad I hardly get the chance to prove it!!!!

And if they were to live in the same city I would bombard them with fun stuff all the time.... but being what the situation is.... i get few opportunities to show my love..... so this time i decided to make both of them really special gifts

Since both are now around two years old... I figured they would take to learning numbers... So I decided to make them little number books...

I have had a massive crush on all things felt... Love the fabric love the colours and love that little kids can't tear it like they would paper!!!

So I went on a mad hunt in Bombay for felt fabric... Not as easy as you would think... I finally struck gold at the ever green something special of cheap jack fame... Expensive but good quality.... I bought pretty much every color they had!!!!

I had seen these really fun activity books made of felt on Pinterest and was fully inspired....

So there are two versions..... the first one I made I glued all the little elements onto the felt fabric. I used a good fabric glue.... but for some reason I don't think it will be long lasting.... I need to ask my sister!!!!

The other one I actually sat and stitched each little element...... took me forever.... but I think it will stand the test of time... more like the test of a little baby going at it!!!!!!!

Figuring out the little elements for each number was such a task....  though it really got my creative juices flowing.... what elements would a little baby boy connect to? flowers stars hearts the sun..... a million options but then they had to also be something that I could cut easily.... considering my page size was just 3" x 3"....

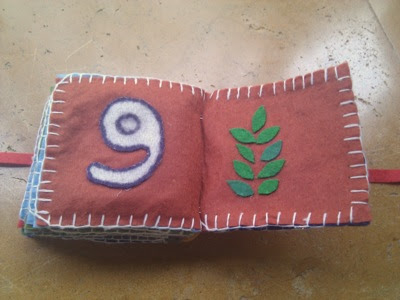
The other major task was binding.... firstly binding each page together... had to learn the blanket stitch from my mommy.... for that finding the right thickness needle and wool that would go through two layers of felt was important!!!!! The over all binding was much easier..... and pretty quick... considering how fat the book turned out to be...

Here are pictures of both the books....


The colors are all exactly the same.... just the first ones are all taken on my old google nexus and the second book was shot with my mums nikon..... guess this is direct proof that good old regular cameras beat a phone camera anyday!!!


Since I first made the book of the first set of pics, you will see plenty of changes in the second set... I guess I learnt from a lot of silly mistakes....


So the reason I used the same color for all the balloons this time was because my brother said that a kid will associate the same colors when he is counting and if the colors of the balloons are different he would get confused.... Don't know how far that might be true.... but I thought may as well!!!!


The clouds were my favorite.... and on the light blue sky.... I just loved them!!!


Same thing with using similar colored hearts as the balloons..... also I liked not outlining them no? what do you think?


You'll notice my number cutting has become much better in round two.... much neater!!!


The fishes were the worst!!! From cutting to stitching to sketching on them.... oh my God.... next time no fishes!!!!


This is the only one where i preferred the original placing ..... so much prettier.... also don't you feel the stitching and no outlining of the numbers is really neater?


After the clouds this is my favorite..... so pretty they look!!!


Again I prefer the original writing.... much clearer I think.....

So yeah.... these were my fun number books.... hope both those little boys are enjoying them as much as I enjoyed making them!!!